Saturday, April 7, 2012
Job Search Analysis: Position 2
The second job I looked into or found that deals with my major was being an employee or photographer full-time for Portrait Innovations in Lincoln, Nebraska. I had to submit a cover letter and a resume' to be considered for this job. The basic requirements of the job is to have an Associates Degree. It doesn't say you need it in anything specific, but you also need to have a strong interest in photography, enthusiastic about sales, high energy/outgoing personality, strong computer skills, ability to multi-task and excel in a fast paced work environment, excellent team player, professional attitude and appearance, and the availability to work weekends, holidays, and extended hours. The responsibilities of the job include overseeing all studio functions, shooting a variety of photographs, selling portrait packages, portrait manufacturing, driving sales and meeting sales goals, cash management, maintaining studio upkeep, and customer relations. The benefits of the job is a paid training program, first year compensation potential of $30,000, annual bonus opportunity, dollar allowance for medical benefits, life insurance, paid vacation and holidays, and lastly fast track career advancement. The salary range is obviously around $30,000 for the first year. The job would like you to have at least two years of photography experience, which I do have. I got this job from the Monster Jobs website. Clicking the link will take you to the specific job post.

Sunday, April 1, 2012
Adobe Tutorial Blog 20
How to create a Duotone Image
Step number one on creating a duotone image is pick out a picture you would like to have two different colors mixed. It works best if the colors are gray/black then a different brighter color. The first step when you have your image opened in Adobe Photoshop is to change it to a Grayscale image and to do this you go to Image > Mode > Grayscale. The next step after this is do the same thing, except this time choose Duotone, so Image > Mode > Duotone. You can then choose a color of your choosing you would like to be mixed with black. In my opinion a brighter color works best just make sure its a Pantone Color. You also could choose another color beside black to but it makes it a little harder to see because it blows out the picture a tad bit. After you choose the colors you want then just click OK and your image is now a Duotone. I will have my examples shown below and I learned this from Digital File Prep Class, not just from the Print Production Book, but also in class. These images are pictures that I have taken also.


Step number one on creating a duotone image is pick out a picture you would like to have two different colors mixed. It works best if the colors are gray/black then a different brighter color. The first step when you have your image opened in Adobe Photoshop is to change it to a Grayscale image and to do this you go to Image > Mode > Grayscale. The next step after this is do the same thing, except this time choose Duotone, so Image > Mode > Duotone. You can then choose a color of your choosing you would like to be mixed with black. In my opinion a brighter color works best just make sure its a Pantone Color. You also could choose another color beside black to but it makes it a little harder to see because it blows out the picture a tad bit. After you choose the colors you want then just click OK and your image is now a Duotone. I will have my examples shown below and I learned this from Digital File Prep Class, not just from the Print Production Book, but also in class. These images are pictures that I have taken also.
Original Image

Duotone Image (Final Image)

National Logo Redesign Post
The logo I decided to discuss is the Coca-Cola logos. The Pepsi logo is on this too I realize this but this is the graphic or picture that takes you through the whole years of both products. I got this from the Flowing Data website. Between both soda brands, Coca-Cola to me has the most creative name logo brand because they have so many new improvements to their logo compared to Pepsi, I mean their logo looked cool at first but now it just a plain font that's kind of dull in my opinion. Did you know that each of these soda companies have been going against each other since the late 1800s? They have been throwing mud against each one another for the longest time according to the article I read. Coca-Cola began in 1886. According to Pepsi v. Coke article, "The Coca-Cola script (which is simply a form of Spencerian Script) began life quite thin and irregular, then became much thicker and didn't thin again out to the refined version we're now familiar with until around the 1940s." Coca-Cola has made quite a few adjustments to their logo because of readability. As you can tell, it was harder to read it back then it is now. The plan after 1987 was to add a little hint of shading to the Coca-Cola swoosh. Then by the mid 1990's they starting adding a gradient to the logo to make it more appealing. Coca-Cola tries to get viewers attentions by convincing not just the kids to buy it like Pepsi does, but it convinces the whole family like using the Simpsons TV Show for a commercial and also using the polar bears every year to make people happy during the holidays and helps convince them to purchase Coca-Cola. During the time when the logo for Coca-Cola was being made, supposedly the taste had changed for a few years so when they came up with a better logo that added the word natural in it then the original taste came back with the title. It then became a product with major stability and a huge major icon of the world and industry that everyone recognizes. In my opinion, I love the way Coca-Cola taste better than Pepsi, but with logos I still like the logo for Coca-Cola because it stands out more than any other pop and is easy to find with its bright red color in stores. I got most the information from the Pepsi v. Coke website and I learned quite a bit about Pepsi and Coke logos and the redesigns of each.


Another neat picture online, that I found and thought it would work for this article as well.

Tuesday, March 27, 2012
Everyday Design Inspiration Blog
Everyday Designs
I have 5 examples that each have their own picture and I will explain the specified criteria that's on the criteria sheet.
The first label I thought looked neat and you do see quite a bit when buying alcohol is McCormick Gin. The target audience is obviously anyone is 21 or older. I feel like the color is good for this clear bottle because the yellow makes the silver typography stand out and the blue at the very top stands out using a reverse technique. The call to action is that the product is obviously going to be bought by someone who wants to drink some alcohol. The production process is done in a specific factory I am sure and that's how these bottles are made. I thought the logo looked really neat and I wanted to share it for this blog. Some of the font is a little tiny at the bottom, but other than that the label looks really good.

The next product that I chose to take a picture of that has a cool design is this pure protein jug. This products target audience is to males probably 16 or older who want to build muscles while lifting weights so they can look fit. The call to action is that it says, "Eat Good, Look Great." It is saying if you use this product you will look good in the end because it has 100% Protein. The production process is from a factory as well because they have to design the label then print an adhesive label then put it on this jug. The color goes with the product because the chocolate flavor being advertised is obviously brown. The typography definitely stands out great because of the different types of fonts they used and the facts it has on the front of it. The logo design looks great overall to me because of what I just said as well.

Another item I took a picture of was my friends canteen that she got from Las Vegas on her Spring break. The target audience I say would be to visitors of 21 or older of age that visited Las Vegas and call to action is basically just inspiring customers to buy this so they can have a momentum of Las Vegas. I would say the typography and logo are very hard to read because you can barely read Las Vegas underneath the blue glitter all over the canteen. The color to me sort of goes with the product, but like I said before it is very hard to read. The production process for this canteen was done probably from a special company that the city of Las Vegas goes through to get specific products made for tourists to remember the town they visited.


The last image I decided to take a picture of was Mr. Goodcents Subs & Pastas magnets. The call to action on this magnets is we deliver. They list their number brightly with the red typography to grab the viewers attention. The target audience is anyone who loves to eat fast food and anyone in general really. The logo design is in a good spot I think and it definitely grabs the viewers attention. I like the fact the call to action is white, the number is red, and the store and its information is in black because it looks more professional. The production process was to go through a print shop and print a bunch of Mr. Goodcents magnets to hand out to the community to gain business from potentially new and old customers. All the information I wrote on here was from what I learned over the years in graphic design and digital file prep because the books explained most of the designed process and each professor explain it well too.

I have 5 examples that each have their own picture and I will explain the specified criteria that's on the criteria sheet.
The first label I thought looked neat and you do see quite a bit when buying alcohol is McCormick Gin. The target audience is obviously anyone is 21 or older. I feel like the color is good for this clear bottle because the yellow makes the silver typography stand out and the blue at the very top stands out using a reverse technique. The call to action is that the product is obviously going to be bought by someone who wants to drink some alcohol. The production process is done in a specific factory I am sure and that's how these bottles are made. I thought the logo looked really neat and I wanted to share it for this blog. Some of the font is a little tiny at the bottom, but other than that the label looks really good.

The next product that I chose to take a picture of that has a cool design is this pure protein jug. This products target audience is to males probably 16 or older who want to build muscles while lifting weights so they can look fit. The call to action is that it says, "Eat Good, Look Great." It is saying if you use this product you will look good in the end because it has 100% Protein. The production process is from a factory as well because they have to design the label then print an adhesive label then put it on this jug. The color goes with the product because the chocolate flavor being advertised is obviously brown. The typography definitely stands out great because of the different types of fonts they used and the facts it has on the front of it. The logo design looks great overall to me because of what I just said as well.

Another item I took a picture of was my friends canteen that she got from Las Vegas on her Spring break. The target audience I say would be to visitors of 21 or older of age that visited Las Vegas and call to action is basically just inspiring customers to buy this so they can have a momentum of Las Vegas. I would say the typography and logo are very hard to read because you can barely read Las Vegas underneath the blue glitter all over the canteen. The color to me sort of goes with the product, but like I said before it is very hard to read. The production process for this canteen was done probably from a special company that the city of Las Vegas goes through to get specific products made for tourists to remember the town they visited.

I found this billboard on my way back to Pittsburg, KS. I thought at first it looked interesting which it does, but the thing that bothers me the most about it is how the main part of it is not straight, its not flatly pressed on there. It's all wrinkly which really bugs me. The target audience could be anyone because it has something that would interest anyone. The call to action is,"The Auto Show, Cruise-In, and Concert." The typography and the logo design to me seems like it is pushed together and I think it could even be put on a bigger billboard then this one specifically. The typography at the bottom I feel could be a little bigger and the fonts seem like there is too many different fonts going on as well. The production process obviously put together by the town of Pittsburg and is sponsored by all the businesses listed all around the border of the billboard.

The last image I decided to take a picture of was Mr. Goodcents Subs & Pastas magnets. The call to action on this magnets is we deliver. They list their number brightly with the red typography to grab the viewers attention. The target audience is anyone who loves to eat fast food and anyone in general really. The logo design is in a good spot I think and it definitely grabs the viewers attention. I like the fact the call to action is white, the number is red, and the store and its information is in black because it looks more professional. The production process was to go through a print shop and print a bunch of Mr. Goodcents magnets to hand out to the community to gain business from potentially new and old customers. All the information I wrote on here was from what I learned over the years in graphic design and digital file prep because the books explained most of the designed process and each professor explain it well too.

Monday, March 26, 2012
Magazine Ad and Billboard Thumbs and Roughs Blog
Magazine Ad Thumbs and Roughs Project
I chose to put an ad if I could would be to put an ad of my photography business in Peoples Magazine. The file format will be done in Adobe InDesign. My design has live area within all the pictures that are on it. All the pictures that are going to be on this project will be my own that I have taken. I am thinking I will do this magazine in black and white so it will save me money in the long run, which would cost me $214,100 which I am pretty sure there is no budget. The cost for color if i decided to do it in color would be $305,900 for a full-page ad. The purpose of the ad is gain viewers attention about booking a session with me and learning about my business. Call to action is getting people interested in sessions and they will find out more scanning the Microsoft Tag that I have placed on the ad. The live area in the ad itself is 7 inches wide by 10 inches high. The bleed size would be 8 1/8 inches by 10 3/4 inches. The trim size would be 7 7/8 inches by 10.5 inches. The From the Master image list I plan to use screen tint, reverse, and gray scale images.


Billboard Thumbs and Roughs Project
The billboard project is way different than others because for one you have to try to catch someones attention from a far away view because a billboard is 10 feet 5 inches by 22 feet 8 inches. It's huge basically and that's a big part of it why it's so different and you need to use as few words possible so it will be easy to read when driving by it on the highway. You do need to focus on your images resolution when doing this project because you want to make sure your image is crisp and sharp looking so it doesn't look awful like since I am doing my project over my photography business than I need to make sure my images look sharp and clean. The pixels when building a billboard need to be at 72 ppi.
The purpose of the billboard is gain viewers attention about booking a session with me and learning about my business. My call to action is making people become familiar with my business by seeing it on a billboard so they know it actually is a business. My target audience is parents and couples because they are the main people who always book sessions, whether its seniors, engagements, etc. My plan is to use a 4 color raster from the master image checklist when doing this project so the billboard stands out. The size of the document in InDesign will be 19.5 inches wide by 15.5 inches high. The actual size of the billboard would be 10 feet 5 inches by 22 feet 8 inches and the trim size is 10 feet 6.5 inches by 22 ft 9.5 inches. The bleed will be .125 inches in the InDesign layout. and margins will be .25 inches. The file type will be a Photoshop document and turn into a JPG when finished. I forgot to mention the price to produce a billboard of 10 feet 5 inches by 22 feet 8 inches is about $700.


I chose to put an ad if I could would be to put an ad of my photography business in Peoples Magazine. The file format will be done in Adobe InDesign. My design has live area within all the pictures that are on it. All the pictures that are going to be on this project will be my own that I have taken. I am thinking I will do this magazine in black and white so it will save me money in the long run, which would cost me $214,100 which I am pretty sure there is no budget. The cost for color if i decided to do it in color would be $305,900 for a full-page ad. The purpose of the ad is gain viewers attention about booking a session with me and learning about my business. Call to action is getting people interested in sessions and they will find out more scanning the Microsoft Tag that I have placed on the ad. The live area in the ad itself is 7 inches wide by 10 inches high. The bleed size would be 8 1/8 inches by 10 3/4 inches. The trim size would be 7 7/8 inches by 10.5 inches. The From the Master image list I plan to use screen tint, reverse, and gray scale images.
Thumbs

Magazine Ad Roughs 1 & 2
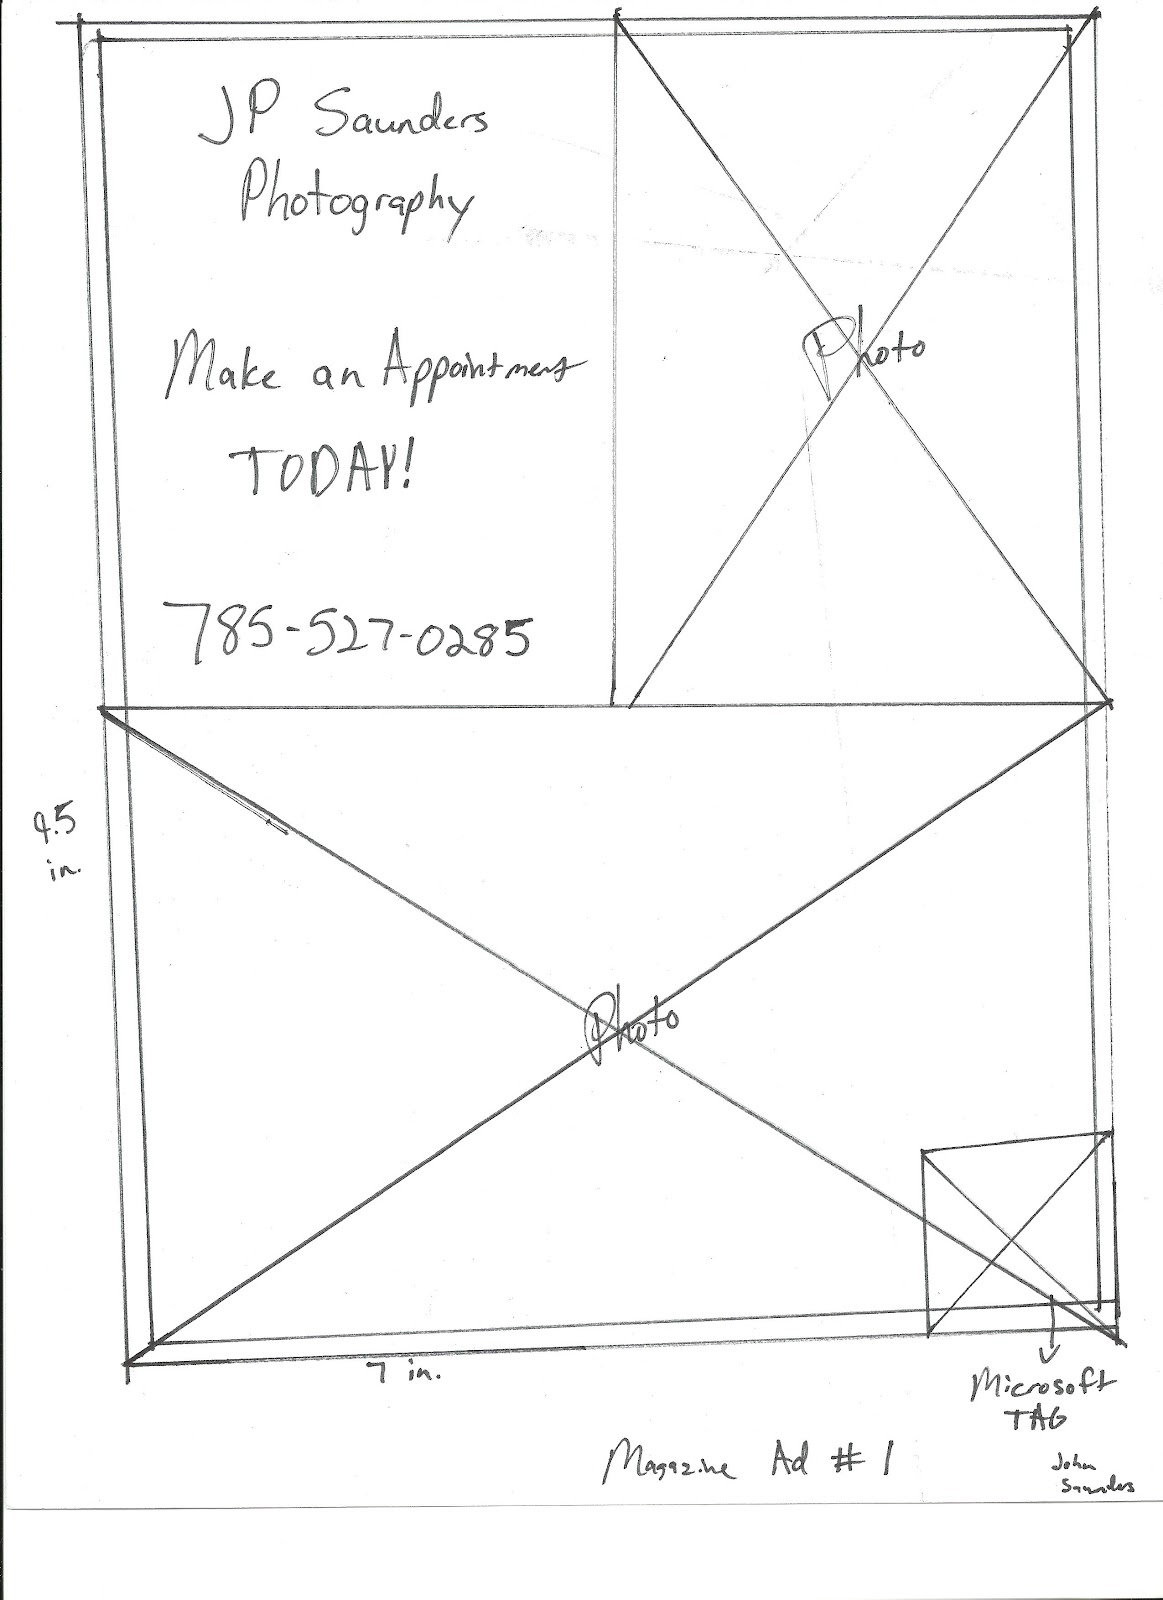

Here is the final project image. From the Master Image Checklist I used a screen tint, a reverse, and a 4 color raster for my images that are copyrighted under me.

Billboard Thumbs and Roughs Project
The billboard project is way different than others because for one you have to try to catch someones attention from a far away view because a billboard is 10 feet 5 inches by 22 feet 8 inches. It's huge basically and that's a big part of it why it's so different and you need to use as few words possible so it will be easy to read when driving by it on the highway. You do need to focus on your images resolution when doing this project because you want to make sure your image is crisp and sharp looking so it doesn't look awful like since I am doing my project over my photography business than I need to make sure my images look sharp and clean. The pixels when building a billboard need to be at 72 ppi.
The purpose of the billboard is gain viewers attention about booking a session with me and learning about my business. My call to action is making people become familiar with my business by seeing it on a billboard so they know it actually is a business. My target audience is parents and couples because they are the main people who always book sessions, whether its seniors, engagements, etc. My plan is to use a 4 color raster from the master image checklist when doing this project so the billboard stands out. The size of the document in InDesign will be 19.5 inches wide by 15.5 inches high. The actual size of the billboard would be 10 feet 5 inches by 22 feet 8 inches and the trim size is 10 feet 6.5 inches by 22 ft 9.5 inches. The bleed will be .125 inches in the InDesign layout. and margins will be .25 inches. The file type will be a Photoshop document and turn into a JPG when finished. I forgot to mention the price to produce a billboard of 10 feet 5 inches by 22 feet 8 inches is about $700.
Thumbs

Billboard Roughs 1 & 2
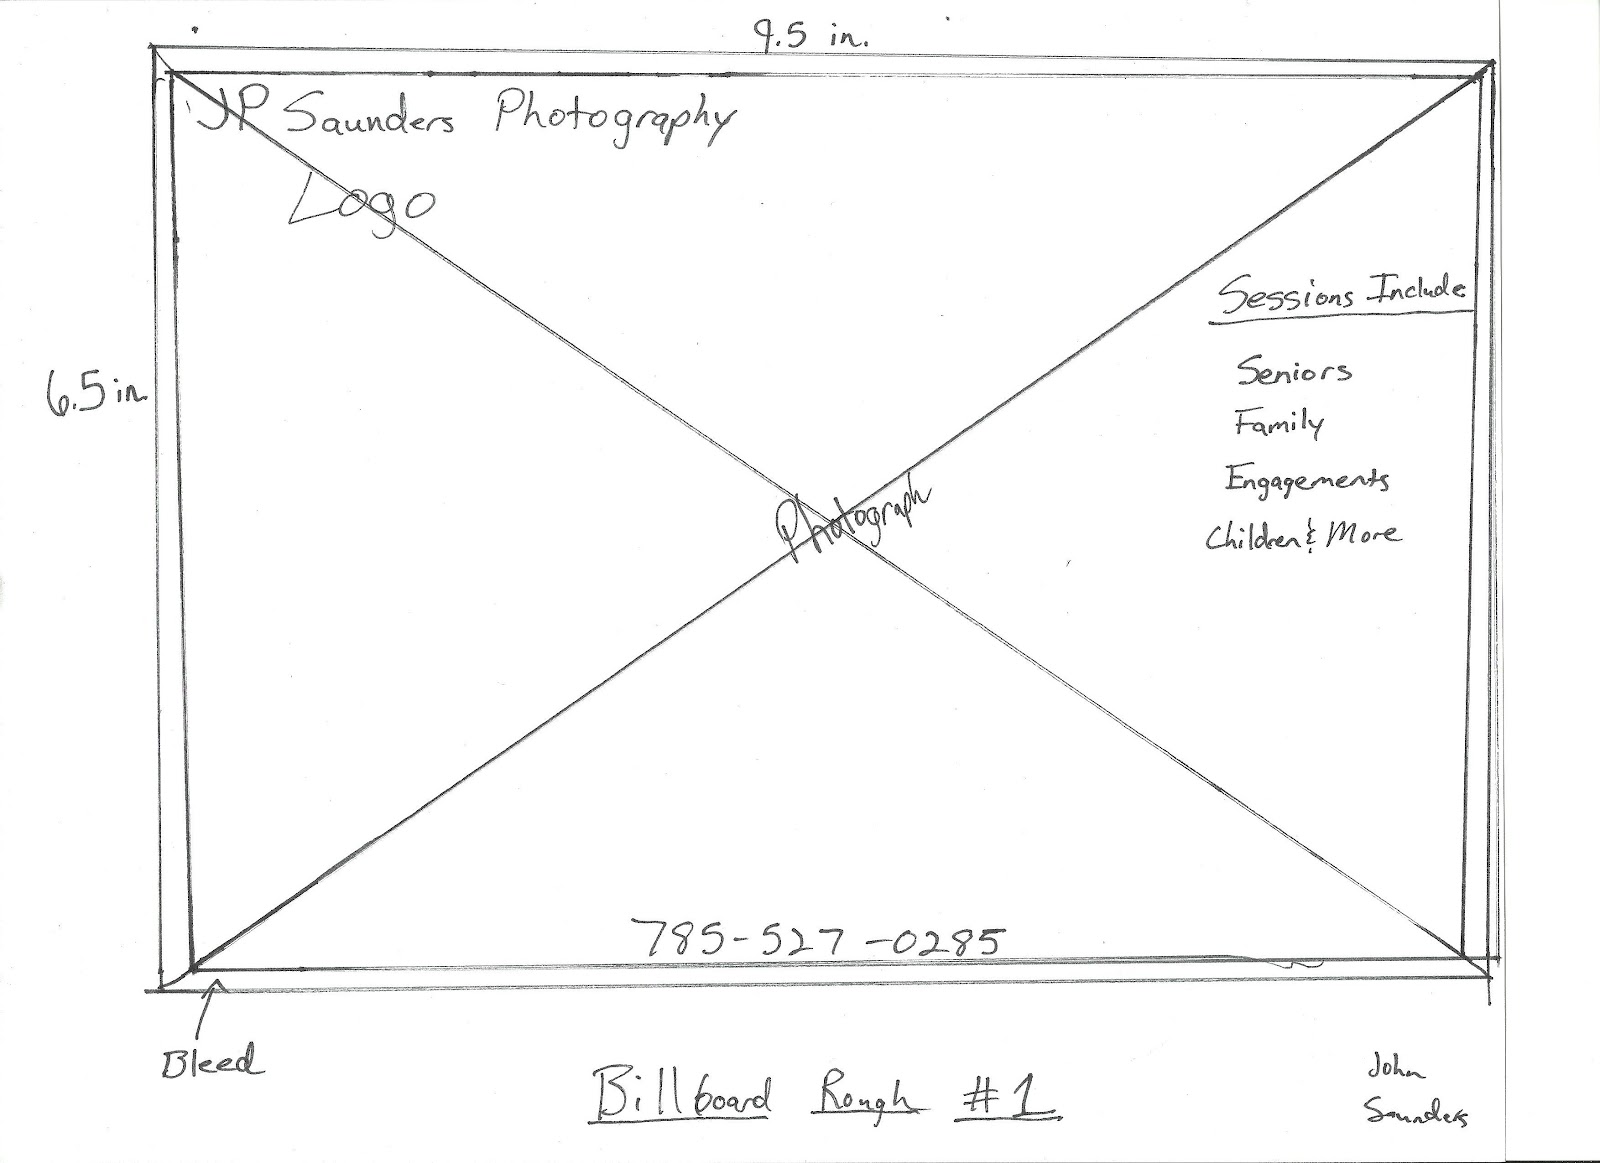

Billboard Final Image. I didn't use anything from my Master Image Checklist for the Billboard Project. The image is copyrighted underneath me.

Tuesday, March 13, 2012
Job Search Analysis 1
The job I found was being an information technology digital photographer full-time at Northrop Grumman in Topeka, KS. It is a type of corporation. Basically the point of the job is they tell someone what they need to take pictures of then they take them then work at a desk trying to perfect them on Photoshop. I meet the qualifications of having some college experience in my field, because I got it from Pittsburg State University. It says the individual needs to know how to use Photoshop, which again I know to use that because I use it literally almost everyday. The basic qualifications said I need to pass a background and drug test. I have no worries anything will show up because I have nothing on my record and I have never done drugs. The site says, "The work schedule could be flexible to adapt to the person's class schedule. Work would be performed between the hours of 7:45 a.m. to 4:15 p.m. No weekend or nights are anticipated. This job is located in Topeka, KS so if I was happened to get this job that I did actually apply for I would initially plan to move there so I could work there starting hopefully this coming summer. The job does not list its salary range, but does say its negotiable. I found this posting on Glassdoor.com website and the site where the job is posted is on this link.
Saturday, March 10, 2012
Adobe Software Tutorial Blog 15
Adding a Vignette to a Photograph
When adding a vignette to a photo, the first task you do is create a new layer. Then after that you click the gradient tool on the left side of the screen. Make sure you have black as the fill color or this will not work. You also need to make sure above at the top of the screen after you click the gradient tool that you click the arrow pointing down that gives you more options on gradients and you click the second one. After that you click and drag from each side of the picture to how far you would like the gradient to be on your picture. Then you can fade the gradient or vignette by just bringing down the opacity to whatever you want. The tutorial suggest you bring it to at least no lower than 30%. After this you can flatten the image and save it. After that you have just produced vignette photo. Examples of my pictures shown below. I got this tutorial off of YouTube.
Original Image

Final Image after applying a Vignette

Subscribe to:
Posts (Atom)